
Now before I start I just want you all to know that I am not an expert at this. I only started nail stamping this year and I know I still have a long way to go as far as achieving perfection goes, however, I do think that I have figured out a few tips to help other beginners and especially those that are financially savvy.
I have been into nail art for a while now. I really like having painted nails, but I especially like having artfully painted nails. I discovered nail stamping after watching videos by Elleandish on Youtube and at first I wasn't a huge fan. It's not that Janelle's nails didn't look gorgeous (really they were stunning), I just wasn't keen on the idea of "cheating". After coming across so many cute wallpaper pattern nail designs on pinterest I couldn't resist trying it out. I do think that while some people probably assume that nail stamping is easy-peasy (well it can be if you have the know-how and the right tools) I know some people can be a bit too intimidated to try. Those who have tried and had difficulties may be discouraged to have another go. So as you can see my objective here is to show you how nail stamping can be accomplished and it can be affordable.
If you follow me on Facebook you may already know that I attempted to do step by step pictures for you and totally failed. I have however seen plenty of posts on the blogosphere illustrating how to do that. So I thought I would include a brief list of instructions, some links to other peoples posts that may be helpful, And, by sharing some insight/tips of my own.
Also, quick note: Moyou and Konad are nail stamping brands that sell plates, stampers and special polishes.
BRIEF INSTRUCTIONS:
- Start with clean nails that are filed smooth. Best if nails are med-long.
- Paint a base colour/s. You may use any type of polish you like so long as it is not too bumpy to stamp over.
- Select an Image plate and the specific design you want to use.
- Apply a bit of your stamping polish to the nail plate.
- Hold your scraper at a 45 DEGREE ANGLE to the plate and slide it along to remove the excess polish from chosen design.
- Push the stamper down on to the design.
- Push the stamper down on to the nail to transfer the design.
- Once dry apply a topcoat.
HELPFUL LINKS:
- Konad Nail Stamping Basics - Elleandish/Janelle - Youtube
- Konad Q&A -Do Not Reefreeze Blog- Blogspot
- Polish That Works With Konad - SassIte Stamping Stampede Blog-Wordpress
MY TIPS:
Some of these are tips I have picked up from other bloggers (sorry if I haven't referenced you I don't quite remember who I got some of them from and some of them are sort of general tips mentioned on a lot of different places, so I'm not sure there would be a point in giving credit), and some of these tips are things I have figured out my self in this learn-as-you-go process called nail stamping.
Start with the Base Colour:

^Here are some China Glaze colours I own. I tried these ones out as stamping nail polishes but they weren't really pigmented enough to show up on my nails. They are great base colours though and apply very smoothly.
- You don't need to spend a lot of money on a base colour. Any colour should be fine unless the polish is textured (aka, has chunky glitters or is a crackle type effect).
- If you decide to use a thick glitter or shimmer polish as a base colour do consider a simple stamping design with thicker lines so that it doesn't get too busy looking.
- If your nails are uneven and brittle use a base coat under your base colour.
- Don't go in blind! Figure out what colour combo and design you want before you start so you don't wreck all your hard work rummaging around for a stamping colour or image plate.
- I recommend using a matte/creme base colour with a metallic stamping polish and vise versa. This not only means that you have the contrast between colours, but between the textures as well.
Stamping Polish

^Here are the four stamping polishes I currently use. From left to right: Liquid Leather by China Glaze, Sonic Bloom by Sally Hansen (Insta-Dri), Platinum Silver by China Glaze and Speedy Sunburst by Sally Hansen (Insta-dri).
- You can by Special Stamping Polishes off of Ebay, Konad and Moyou Stores.
- You don't need to buy brand polishes, but you can't just use any polish(or the design won't show up on your nail)
- Use the link I shared in the links heading on this post to see what polishes Sasse says works.
- If you are unsure google the name of the polish and "Nail Stamping" to see if the polish can be used to stamp.
- Take note of what other people are using so you know what to buy.
- When stamping make sure you take as little time as possible between applying the stamping polish to the image plate and getting it to the nail as some stamping polishes (or substitutes) can be quick drying.
Top Coat:

^Here is a collection of Base and Top Coats. I would generally just use the Sally Hansen ones for nail stamping, but if I were to use a shimmery or glittery top coat over the top I would then use a Revlon quick dry top coat to ensure that it dries.
- To avoid smearing the stamped image make sure it is dry before you apply top coat.
- Apply it in big drops touching the polish as lightly as possible to avoid running colours into each other.
- Google recommended top coats for use with Konad or Moyou.
- You can use a really fine glitter top coat or put a swirl of glitter outside of the stamped image, but be careful about using chunky glitters over stamped images as it may cover too much of your design.
Image Plates:

^Here is the 'HP' Plate by Vanity Nails

^This is the 'Cartoon Heaven' Image Plate from Vanity Nails

^Here is a small Hexagon Nail Plate I purchased from Nail Art Fairy on Etsy.

^I haven't opened this plate yet. As you can see it's still got the blue stuff on it. It's from Nail Art Fairy.
- Nail plates can be purchased from Moyou, Konad, Ebay and Etsy.
- If you are unsure about the quality of a plate you want to buy google reviews on it.
- The cheap circle plates I first tried had very fine designs that wouldn't transfer. Use image plates that are etched deep so you can ensure the image will transfer.
- Some of the designs on the cheaper plates are awkward sizes, so be aware that you may not be able to use all of the images on your nails.
- When buying individual image plate designs you want the design to be small enough to fit on your nail without important parts being cut off.
- When buying patterned image plate designs you want the design to be bigger than your nail so you will get all of the nail covered.
- You can also compare the image size of different brands here
Stamper and Scraper:

^This is the stamper and scraper combo I use. I bought this off of eBay.
- Plastic scrapers are less likely to leave scratches on your plates than a metal one will.
- The squishier the stamper, the better. If a stamper is really squishy it won't require as much force to transfer the image.
- Don't buy the cheap purple stamping kit from Target. I bought the same one even cheaper off eBay and I don't recommend it.
- When stamping large designs use a slight tilting/rolling motion to ensure all of the design is transferred. Remember nails are slightly curved.
Extras:

^Here is my nail dryer (battery operated) and nail art pen
- Nail dryer or a hair dryer can help to dry nails between coats.
- Nail art pens or lacquers in the same colour as your stamping polish can be helpful for fixing up smudges or missed sections of your design.
- Use scrap paper to test out your stamper and to protect your furniture or floor from nail polish.
Cleaning Up:

^Here is a pic of some of the nail polish removers I use. They are both cheap, but they both work well.
- Keep an express nail polish remover on hand so that you can remove a smudged nail without stuffing up the rest of them.
- Make sure you clean off nail plates after use. I hate doing this as the nail polish remover wipes usually take off the polish on my hand so I like to ask a family member (like my dad) to pretty please clean the nail plate.
- Most nail stuff should be cleaned with nail polish remover and then dried. Water tends to make it go sticky and gross.
HERE ARE SOME OF THE NAIL DESIGNS I HAVE DONE:

^Nostalgic Nail Lacquer in Karma Chameleon with A HP by Vanity Nails stamped statement nail.

^Just a cheap Minnie mouse plate from Nail Art Fairy on Etsy.
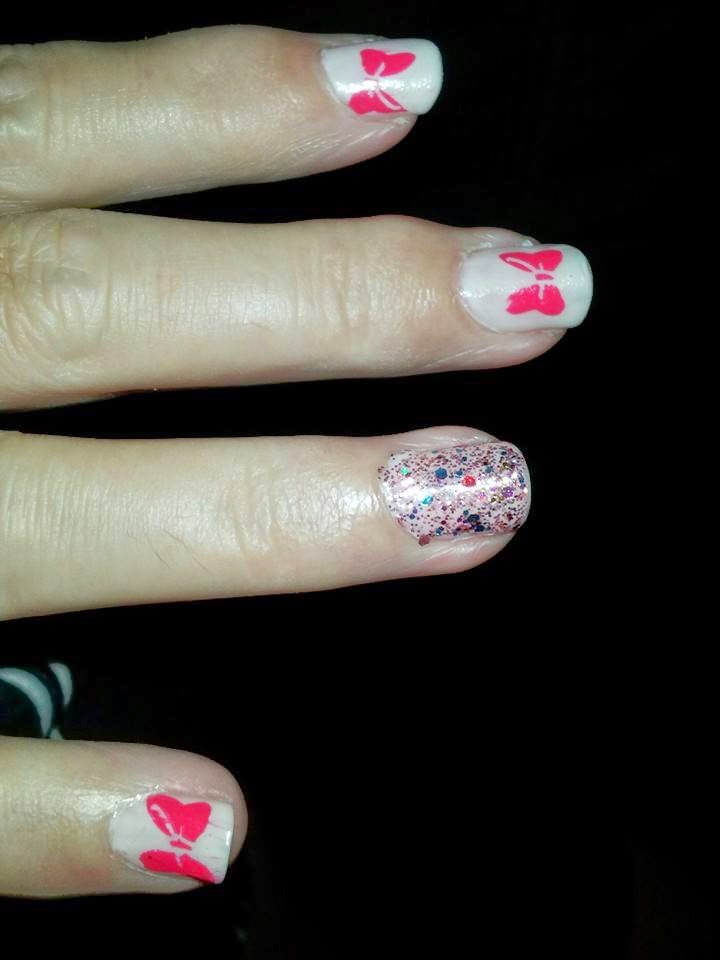
^Another cheap nail stamp used in this one.

^Not sure if you can see. Stamped silver onto purple. A combination of cheap nail images and ones from the Vanity Nails Cartoon Haven Plate.
WHERE TO BUY:
- Vanity Nails Plates
- Nail Art Fairy Plates
- Where I buy my Sally Hansen Insta-dri
- Where I buy my China Glaze
- Priceline Australia
MAIN POINTS TO REMEMBER:
- Scrape Excess at 45 DEGREE ANGLE
- Google is your best friend. Use google to find out what polishes, plates and stamping sets work.
- Try not to take too long to transfer your image or the polish will dry.
- Be careful applying top coat so you don't smudge your design.
- Don't use water to clean image plates. A nail polish remover wipe and a tissue are recommended.
I hope this was a helpful post. I only listed links to where to buy stuff that I have used as I do not want to link you to things that aren't any good. I hope all of the pictures, tips and links were helpful and if you want to know any more please comment with your questions so I can help. Like I said earlier I am not a professional.
Your Favourite Blogger,
Natalie
No comments:
Post a Comment